Today is the final blog in my five day bonanza of Jubilee art and crafts ideas for Primary Education.
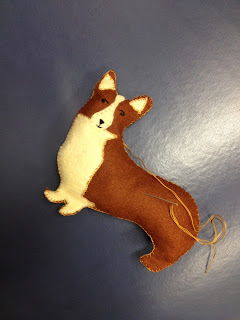
In today's blog we look at one of the Queens favourites, a beautiful Corgi decoration.
Key Skills: Colour, form and Shape
Materials: Felt material, ribbon, PVA glue, thread, sewing needle, stuffing and glitter glue
Vocab: Pattern, cut, sew, layer, language relating to sewing such as thread, stitch, blanket stitch, cast off
Learning Objectives :
To make a small felt decoration that represents the Jubilee celebrations
To develop sewing and embroidery skills
To understand the importance of design work
To explore the use of felt material to make objects
To develop cutting skills
Process:
Stage 4: Using a contrasting coloured felt, I cut out patches for the face and the chest part of the corgi.
Step 7: Using a blanket stitch the two pre-cut corgis shapes together. Leave a small gap to allow you to stuff the decoration to add form.
Step 8: Sew up the opening, I have added a piece of string on the top of the corgi’s head to allow my decoration to be hung up.
Step 9: Embellish your decoration. I have added a crown, bow and necklace to my corgi to make him fit for the finest Jubilee party.
An alternative design, on this piece I have made a small teacup in the centre with a teabag hanging from the cup with the quote “Keep calm and Carry on”.
Key Stage 1: You can use a hand held hole punch such as http://www.fiskarscraft.co.uk/Products/Craft/Punches/Eyelet-Setter/Eyelet-Setter-Pack to make holes in the felt to make it easier to sew for younger pupils. Alternatively younger children can use PVA glue to stick their rosette together. You could also make the rosette in the same manner using tissue paper of funky foam. Why not experiment with a few materials?
Key Stage 2: Think about what your decoration is going to be used for? Will it hang on a bag, a mobile phone, a magnet, be made into a keyring or simply a decoration to hang up in the house.
That's the last entry for now for my Jubilee arts and crafts. Don't forget I would be delighted to see pictures of any work you have created for a special Jubilee art Blog in June. Send your images to lisamart@hotmail.co.uk


2 comments:
hello Lisa I Like this one so easy for the children to make and for the rest of the family to become involved.
We are a group of volunteers and opening a new scheme in our community. Your web site provided us with valuable information to work on. You’ve done a formidable job and our whole community will be grateful to you.
Post a Comment