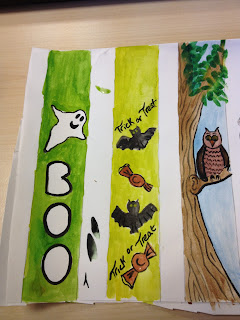
Part three of my Halloween ideas brings you these stunning spooky bookmarks. Guaranteed to inspire children to pick up a book and put them to use.
Brief Description: What a great way to inspire young readers - create your own unique book mark. These cute bookmarks have been designed with an Autumn or Halloween theme, but these can be adapted to any theme. Intricate designs can take time to complete to make this a full lesson or designs can be supplied to make this an extension activity. This activity can also be used for fund raising ideas for school fetes, with children making numerous bookmarks that can be sold to friends, parents, governors and stakeholders
Keywords: Book mark, design, flexibilty, shape
Materials needed; Paper, felt tip pens, watercolours, scissors, crimping scissors, ribbon, laminating pouch, laminator, glue, google eyes.
Instructions:
- Decide on the width of your book mark. I found
that the average school class ruler is an ideal width. Using a pencil lay
the ruler on a piece of paper and draw down both sides
 |
| Marked out and ready to add detail |
- For my bookmarks I have made a “topper” for the
top of the bookmark. Ask children to think about their design, connecting
with the theme/project given. I have chosen a Halloween and Autumn theme
for my bookmarks. Using the ruler as a marker, draw a further column. Draw
the topper over the top of the column as illustrated in the picture to the
right. Make sure the topper is slightly wider than the column- this will
allow the topper to sit on the top of the book page.
 |
| Make sure that the images that are going to be placed at the top of the book marks slightly overlap the edges of your ruler marks |
 |
| Back grounds drawn on ready for painting |
3. Colour in and cut out you book marks. I have used watercolour paints
for my examples but you can use and drawing or painting medium for this
project. I have also cut out the word “Boo” on my ghost bookmark for
additional effect.
 |
| I have used water colour paint to add colour to my book marks |
 |
| Paint your toppers before cutting them out, this marks it much easier - plus if you go over the edge you can cut it off |
4. Mount the bookmarks on a piece of brightly coloured card. I have
chosen to use a red piece of card to clash against my green bookmark. This
will also highlight my cut out lettered “BOO”. Glue in position using a
glue stick. When dry cut around the edge of the bookmark leaving a slight
boarder. I used crimping scissors but you can use a rota trim, scissor to
cut a wiggly line or even rip around the border for rough edges.
 |
| Cut out the backgrounds and toppers |
 |
| Mount the bookmarks onto a piece of coloured paper |
 |
| I have used crimping scissors to create an interesting edge |
5. Using sticky foam pads (or a piece of cardboard and some glue)
adhere the topper to the top of the bookmark. If you want to make your
bookmarks more robust, before you stick the topper on place the two parts,
the bookmark and topper in a laminating pouch and laminate. You will need
to cut them both out again and can still adhere the topper to the bookmark
using sticky pads or a small piece of cardboard and glue.
 |
| Stick the topper on the top |
6.For a final touch add a bit of ribbon to the
bottom.
 |
| Add ribbon on the bottom for the finishing touches |
 |
| Why not laminate the bookmark for added protection |
Differentiation:
Key stage 1: There are lots of
websites where you can get pre-printed bookmark designs that younger children
can use and colour in (website address listed at the back of this pack).
Alternatively you could encourage the children to use stencils and various
collage materials on their bookmarks – using wool to create spider webs,
stickers of themed subjects, you can even encourage the children to collect a
leaf from outside place it under the piece of paper and rub over the top using
a crayon to create a unique autumn leaf bookmark.
Keystage 2: Encourage the children to write a short poem on
the back of their book mark that will compliment the design on the front.
Rather than have just one topper on the bookmark, children could create a
series of images to adhere to the bookmark. If the bookmark was a witches broom
stick you could add a witch and one end, a cat in the middle and a spell book
at the end. An autumn day could have an umbrella at the top, leaves and rain
drops whirling around the centre and a pair of wellington boots at the base and
so on and so forth.
Gifted and Talented: Think about the use of line,
the idea of design and the method of technique in the medium used to apply
colour. Ie. If the children are working in coloured pencil or pencil, look at
the use of shading and range of colours that can be applied. If using collage
materials are they appropriate for the image, do they enhance the piece? You
could also encourage pupils to add an intricate border feature patterns, words
or symbols related to the centre images, or even use a needle and thread and
blanket stitch a border.

No comments:
Post a Comment