Search This Blog

Welcome to my blog

Tuesday, 29 May 2012

Keep Calm and Paint the Queen

This week I had the pleasure of spending a day at Vange Primary School in Basildon to work with a group of 18 talented pupils from year 1 to year 6. Our mission was to complete a large canvas portrait of the Queen Elizabeth II using acrylic paint, felt material, tissue paper and anything else that came to mind.
Using ideas from my previous jubilee blogs - the ideology behind the piece was for the children to incorporate the style of four different artists to build up a portrait of Queen Elizabeth II:
Van Gogh, Mondrian, Lichtenstein and Klimt
The children explored brush strokes, layering paint, mark making, use of colour, collage and how to interpret other artists work.

In previous workshops I have had to tackle how to keep a small group of children engaged at one time whilst working on the same piece of artwork. To produce a piece of work that the children can be proud of it is often better to work with a small group at one time. For this project I decided to use two canvases that would provide the opportunity for the painting to be split with two groups working on one piece at a time.

Outline drawing of the Queen ready for painting

The first group of children start to put a Mondrian twist on the lower half of the portrait,
painting bold blocks of primary colours

The next artist's style we add to the portrait is the pop art styling of Roy  Lichtenstein
using dots, strips and bold flat colour
 
The children decide to paint the Queens jewel in the royal red, white and blue

We could not decide what to do with the frame for the picture and was unsure of what colours to use. One of the children said it was so hot that they would like some ice-cream, in fact Neapolitan ice-cream. With that the children decided to create a Neapolitan ice-cream themed frame to the piece using cut up squares of tissue paper

Half way through the painting

Van Goghs' swirls and impressionist brush strokes were chosen to portray the Queens hair

And last but by no means least the metallic glittering patterns and jewel like artwork of Klimt was used to create a sparkling crown fit for our Jubilee Queen. For additional sparkle glitter was added

Whilst waiting for the paint to dry the children made jubilee rosette out of felt material.
These were glued using pva glue around the frame

The finished product, a portrait of the Queen referencing 4 different artists with very different styles. 

Friday, 18 May 2012

Corgi's and Crowns

Today is the final blog in my five day bonanza of Jubilee art and crafts ideas for Primary Education.
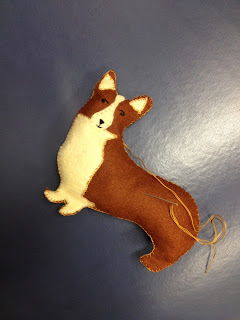
In today's blog we look at one of the Queens favourites, a beautiful Corgi decoration.

Key Skills: Colour, form and Shape
Materials: Felt material, ribbon, PVA glue, thread, sewing needle, stuffing and glitter glue
Vocab: Pattern, cut, sew, layer, language relating to sewing such as thread, stitch, blanket stitch, cast off

Learning Objectives :
To make a small felt decoration that represents the Jubilee celebrations
To develop sewing and embroidery skills
To understand the importance of design work
To explore the use of felt material to make objects
To develop cutting skills

Process:
Stage 1: Take some time to draw your design out on a piece of paper. Think about what decoration you would like. You will need to  make a template to draw around on your felt paper. You can use a stencil or free hand for this – or alternatively research an image you would like to use from the Internet. Print this off to the size required. Cut out the shape and trace around the edge of the cut out on the felt.

Stage 2: Collect the fabric you require. As you do not need a lot of fabric for this activity, this is a great way of using up scraps of material.

Stage 3: For my Corgi I have cut out two brown felt dog shapes. Using the image I found on line.


Stage 4: Using a contrasting coloured felt, I cut out patches for the face and the chest part of the corgi.

Step 5: using a slip stitch, stitch the contrasting panels in positions on one of the pre-cut piece of brown felt. I have used the slip stitch to add a fur texture to the piece.


Step 6: Using black thread stitch on the facial details. For smaller children you could use small buttons or sequins and glue these on for the facial features.

Step 7: Using a blanket stitch the two pre-cut corgis shapes together. Leave a small gap to allow you to stuff the decoration to add form.

Step 8: Sew up the opening, I have added a piece of string on the top of the corgi’s head to allow my decoration to be hung up.

Step 9: Embellish your decoration. I have added a crown, bow and necklace to my corgi to make him fit for the finest Jubilee party.

An alternative design, on this piece I have made a small teacup in the centre with a teabag hanging from the cup with the quote “Keep calm and Carry on”.

Differentiation:
Key Stage 1: You can use a hand held hole punch such as http://www.fiskarscraft.co.uk/Products/Craft/Punches/Eyelet-Setter/Eyelet-Setter-Pack to make holes in the felt to make it easier to sew for younger pupils. Alternatively younger children can use PVA glue to stick their rosette together. You could also make the rosette in the same manner using tissue paper of funky foam. Why not experiment with a few materials?

Key Stage 2: Think about what your decoration is going to be used for? Will it hang on a bag, a mobile phone, a magnet, be made into a keyring or simply a decoration to hang up in the house.

That's the last entry for now for my Jubilee arts and crafts. Don't forget I would be delighted to see pictures of any work you have created for a special Jubilee art Blog in June. Send your images to lisamart@hotmail.co.uk

Thursday, 17 May 2012

Felt Jubilee Rosettes


Day four of my Jubilee art special bring you -Felt Jubilee Rosette
Key Skills: Colour, form and Shape
Materials: Felt material, ribbon, PVA glue, thread, sewing needle and glitter glue
Vocab: Rosette, cut, sew, layer, language relating to sewing such as thread, stitch, blanket stitch, cast off
  
Learning Objectives :
To make a rosette that represents the Jubilee celebrations
To develop sewing and embroidery skills
To understand the importance of design work
To explore the use of felt material to make objects
To develop cutting skills


Process:
Step 1: Take some time to draw your design out on a piece of paper. Think about what is going to be your central image for your rosette, what colours you want around your rosette and what ribbon you would like hanging from the rosette.
Stage 2: Collect the fabric you require. As you do not need a lot of fabric for this activity, this is a great way of using up scraps of material.

Step 3: I have chosen to create a traditional red, white and blue rosette. Cut out three layers, make sure you check with your design to clarify which colour you need the biggest circle to be cut from and which colour will be in the centre of your rosette.


Step 4: Cut out any embellishments that you are going to sew onto the centre of the rosette. You could also attach a button, a badge or use sequins to create your centre piece. I have decided to cut the number `60` out of yellow felt material.

Step 5: Now that you completed your preparation work you are ready to start to sew the piece together. For the rosette you work in the reverse order and start with the centre piece. Sew the yellow numbers to the red centre piece using a running stitch.


Step 6: Sew around the red section to the white section using a blanket or running stitch.

Step 7: Before you sewn the white section to the blue section secure the ribbon with a couple of stitches to the back of the white section. The ribbon for this rosette was purchased from the Fabric Warehouse.


Step 8: Sew the white section to the blue section using a blanket or running stitch.

Step 9: Use a running or blanket stitch around the outside of the blue section to keep a uniform look to the rosette. For a final touch I have added glitter glue around the 60 on the rosette.

<!--[endif]-->
An alternative design, on this piece I have made a small teacup in the centre with a teabag hanging from the cup with the quote “Keep calm and Carry on”.

Differentiation:
Key Stage 1: You can use a hand held hole punch such as http://www.fiskarscraft.co.uk/Products/Craft/Punches/Eyelet-Setter/Eyelet-Setter-Pack to make holes in the felt to make it easier to sew for younger pupils. Alternatively younger children can use PVA glue to stick their rosette together. You could also make the rosette in the same manner using tissue paper of funky foam. Why not experiment with a few materials?

Key Stage 2: Instead of cutting images out for the centre of the rosette, think about images and words that can be embroidered. You can add beads and sequins to create a dynamic and decorative centre of your rosette.

Don't forget to email your pictures if you want them featured on my blog lisamart@hotmail.co.uk

Arty Queen Portrait


Day Three of the Jubilee art brings you a fun activity where children have the opportunity to research and learn about four different artists -Arty Queen Portrait
Key Skills: Shape,colour, form, research


Materials:Picture of the Queen, Images of Vincent Van Gogh, Roy Lichtenstein, PierMondrian and Gustav Klimt’s work, pencil, rubber, cartridge paper, medium towork in such as pencils, crayon or paint

Vocab : Boldcolour, texture, use of line, pattern, Great Masters, brush stroke


LearningObjectives :
To use an internet search engine to resource images
To learn about the work of the artists - VincentVan Gogh, Roy Lichtenstein, Pier Mondrian and Gustav Klimt
To apply knowledge of the artists work listed aboveto individual work
To develop drawing and painting skills
To complete a portrait of the Queen in the style offour different artists


Process:
Step 1: Research your artists. For my portrait I have decided to lookat the bold blocks of colour by Pier Mondrian, the dots and dashes of RoyLichtenstein, the wavy, subtle brush strokes of Vincent Van Gogh and thestunning pattern work in Gustav Klimt’s work.
Klimt's amazing pattern work

The pop art styling of Roy Lichtenstein

The bold colours of Mondrian
The amazing brushwork of Van Gogh

Step2: Once you have decided on your artists, you need to draw an outline of theQueens head. You could also try this technique with other London iconic imagessuch as the Beefeaters, ravens, lions etc.

Step 3: You need to decide which artists style youwant to apply to which part of the portrait. Once you have done this you areready to start.

Step 4: I have chosen to work in pastels and pencilfor my portrait but you can work in any medium for this project and on anysurface. You could use paint on a canvas, paint on wood or even create thepiece using felt material – you are only limited by your imagination and thematerials you have available.

Step5: I chose to start with Mondrian at the bottom of the portrait, colouring insections of bold colour using oil pastels.
  
Step 6: For the face of the Queen I decide to usethe dot work on Lichtenstein. I coloured in the bold sections with pastels andthe dots with pencil.

Step7: For the Queens hair I use oil pastels and pencils creating the wavy subtlelines that Vincent Van Gogh uses in his artwork. I have used three differentcolours to help create texture within the hair.
  
Step8: Finally, for the crown I decided to use the stunning glittering pattern workof Klimt. I looked carefully at the pattern work he used in his art work andreplicated shapes and patterns across the crown in pencil.


Step9: For a final touch I cut the excess from around the portrait and mounted theimage onto black card.
  
Differentiation:
Key Stage 1: For Key stage 1 pupils four artistsmay be a bit overwhelming. It might be more productive to limit this to one-twoartists
.
Key Stage 2: Key stage 2 pupils could select twoartists that they have researched for a couple of sections of the portrait. Forthe remaining two sections the children can come up with their own styles andpatterns. Once again think about what other images this can be applied to aswell as the Queens portrait.

Don't for get to send me your pictures and I will put the best ones on a blog lisamart@hotmatil.co.uk

Tuesday, 15 May 2012

Giant Tissue Paper Stamp


Day two of the Jubilee Art Lesson plans bring you -Giant Tissue Paper Stamp
Key Skills: Shape, form and Texture


Materials: Picture of the Queen, pencil, rubber, PVA glue, cartridge paper, tissue paper

Vocab : Scrunch, texture, assemblage, collage, found materials


Learning Objectives :
To use an internet search engine to resource images
To create a textured portrait of the Queen using tissue paper (or other materials)
To learn about the relationship between lines, edges and spaces
To establish techniques of applying collage materials
To develop fine motor skills


Process
Step 1: Research on the internet to find a profile picture of the Queen. Ask children to draw a line drawing of the Queen onto a piece of A4 paper. For Key Stage 1 pupils you can find a template on the following website : http://www.ichild.co.uk/activities/view/1847/The-Queen-Collage

Step 2: Cut your chosen coloured tissue paper up into small squares


Step 3: Apply glue to one area of the portrait. If you place too much glue on the piece can become messy. It is much easier to work from one area at a time.

Step 4: Scrunch up the tissue paper into small balls and push firmly into the glue. Try not to leave any gaps.

Step 5: Continue with this technique until the section is completely full.

Step 6: Continue to work section to section changing the colours when necessary.

Step 7: Try to add areas of detail, such as the eye and eye brow. This can be done by scrunching up black tissue paper into very small pieces.

Step 8: Once you have completed all of the positive space that makes up the queens head, use a pair of decorative scissors to cut around your image. This will create the illusion of the edge of a stamp – don’t forget to add your price!

Differentiation:
Key stage 1: An alternative idea for Keystage 1 pupils could be to use paint. Place a few plates/trays with different colours in them and encourage the children to use their fingers to paint the inside of the printed Queens head. Try to encourage the children to stay within the lines and vary the choice of colour. Or use a projector to enlarge the picture and use bottle tops and plastic lids to fill in the portrait.

Key stage 2: Use a picture of the Queen to draw an outline of the Queens face. Think about what mediums you can use to fill the positive space. You could use sequins, buttons, tissue paper, badges, leaves etc. What other images could you apply this technique to for the Jubilee? Consider making a telephone box, black taxi, Tower of London, Big Ben or even the Olympic rings!

Don't forget to email me your images, lisamart@hotmail.co.uk the best ones, I'll place on my blog.

Monday, 14 May 2012

Mother's Mask

When I was studying for my degree my tutor gave me some of the best advice regarding my art work - she told me that my art should be about what I love, what I know and what speaks to me. This is probably the most personal piece of artwork I have created.
Last summer after a two year battle my mother was diagnosed with terminal mouth cancer. After undergoing some major surgery and radiotherapy my mother gave me her radiotherapy mask and asked me to make a piece of art from it. Initially I just sat and stared at the mask. I wanted to create a piece of work that spoke of my mothers battles, support, loss of identity, loss of voice, hope, love, courage, love of tea and the terrible disease that is cancer. How do you get all of that into one piece? And more importantly create a piece that motivates and encourages my mother to keep up the fight and not focus of the dreadfulness if this disease. I continued to just stare at the mask.
After a few conversations and fun day out with my mother I decided that I needed to get to work. I think my mother was beginning to think the mask had got buried in the studio and would not emerge again!!!
I decided I would make a piece that emphasised the key issues that I felt my mother was going through:
1. the loss of her voice- by this I don't mean literally, after several operations and the loss of half of her tongue my mothers speech is not as clear as it used to be. This can be just as frustrating for the family as it is for my mother - especially when you are out shopping and the shop assistant talks to you rather than respond to my mother when she asks for something. It is as though people assume that she has no cognitive functions, I cannot imagine how frustrating this must make my mother feel at times.
2. the disfigurement of the surgery
3. the amount of medication my mother has to take
4. the amazing battle and survival of four major operations - averaging around 7 hours each
5. the support from her family
6. my mother love of tea

This is what I have started to make. It is not quite finished as I have to make another part to complete the installation. I hope that this piece shows people how strong you can be, how amazing the human body is and how above all, if you have the love and support of some good people, how anything is possible.
The mask - this is the mask in it's raw state. My mother was screwed down to a table for ten minutes at a time wearing this whilst undergoing her  radiotherapy
Side view of the mask

Back view of the mask

I decided to collect the backs of my mother prescriptions and link these together to make a thread that I could weave with. I used these to weave the torso and face part of the mask. You can see snippets of the medication name, dosage, name etc as you look across the mask

The two side patches and two top head patches have been weaved with bright coloured thread, representing my mothers four children and the support that they offer.
The bright lights shining around

The medal denotes the dates of the four major operation my mother has undergone with the Blue mouth cancer ribbon hanging underneath

As a result of the operation my mother has to feed through a tube however one substance that my mother has been able to hang onto is her cup of tea. As a child I would buy scraps of fabric and old cloths from second hand markets and make toys, and objects out of then. I wanted the tea cup to reflect this activity - something that my mother encouraged.

The mouth is slightly to the side, denoting the disfigurement from the surgery with strands growing out from it. This is  "Lucifer" , which is the name my mother has given her tumour. The black line that goes around the face, mimics the scar that has been left from the surgery

All in all I have tried to make a piece that reflects some difficult issues but that also has a hidden beauty to it, a positive message and a sense of pride of how
incredibly brave my mother is.

At my husbands birthday I got to show my mother the progress of the mask. As you can imagine this was quite emotional, but I was just as pleased as I was shocked, when my mother picked the mask up and put it on.
This year my mother is taking part in the Race for Life for the third time. I cannot put into words how proud and inspired I am by her. Despite all of what she is going through she will be not only raising money but sharing in the hope, courage and inspiration of the thousands of people that will be taking part. Please take a moment and have a look at my mother's sponsor page, https://www.raceforlifesponsorme.org/susanhewett and if you can please donate, even if it can only be small amount. I know it would mean the world to my mother to know that she has raised money to support the fight against this awful disease. Thank you for taking the time to read this blog.