Search This Blog

Welcome to my blog
Showing posts with label felt making. Show all posts

Thursday, 17 May 2012

Felt Jubilee Rosettes


Day four of my Jubilee art special bring you -Felt Jubilee Rosette
Key Skills: Colour, form and Shape
Materials: Felt material, ribbon, PVA glue, thread, sewing needle and glitter glue
Vocab: Rosette, cut, sew, layer, language relating to sewing such as thread, stitch, blanket stitch, cast off
  
Learning Objectives :
To make a rosette that represents the Jubilee celebrations
To develop sewing and embroidery skills
To understand the importance of design work
To explore the use of felt material to make objects
To develop cutting skills


Process:
Step 1: Take some time to draw your design out on a piece of paper. Think about what is going to be your central image for your rosette, what colours you want around your rosette and what ribbon you would like hanging from the rosette.
Stage 2: Collect the fabric you require. As you do not need a lot of fabric for this activity, this is a great way of using up scraps of material.

Step 3: I have chosen to create a traditional red, white and blue rosette. Cut out three layers, make sure you check with your design to clarify which colour you need the biggest circle to be cut from and which colour will be in the centre of your rosette.


Step 4: Cut out any embellishments that you are going to sew onto the centre of the rosette. You could also attach a button, a badge or use sequins to create your centre piece. I have decided to cut the number `60` out of yellow felt material.

Step 5: Now that you completed your preparation work you are ready to start to sew the piece together. For the rosette you work in the reverse order and start with the centre piece. Sew the yellow numbers to the red centre piece using a running stitch.


Step 6: Sew around the red section to the white section using a blanket or running stitch.

Step 7: Before you sewn the white section to the blue section secure the ribbon with a couple of stitches to the back of the white section. The ribbon for this rosette was purchased from the Fabric Warehouse.


Step 8: Sew the white section to the blue section using a blanket or running stitch.

Step 9: Use a running or blanket stitch around the outside of the blue section to keep a uniform look to the rosette. For a final touch I have added glitter glue around the 60 on the rosette.

<!--[endif]-->
An alternative design, on this piece I have made a small teacup in the centre with a teabag hanging from the cup with the quote “Keep calm and Carry on”.

Differentiation:
Key Stage 1: You can use a hand held hole punch such as http://www.fiskarscraft.co.uk/Products/Craft/Punches/Eyelet-Setter/Eyelet-Setter-Pack to make holes in the felt to make it easier to sew for younger pupils. Alternatively younger children can use PVA glue to stick their rosette together. You could also make the rosette in the same manner using tissue paper of funky foam. Why not experiment with a few materials?

Key Stage 2: Instead of cutting images out for the centre of the rosette, think about images and words that can be embroidered. You can add beads and sequins to create a dynamic and decorative centre of your rosette.

Don't forget to email your pictures if you want them featured on my blog lisamart@hotmail.co.uk

Sunday, 27 November 2011

Children's Christmas Crafts no 7 - Felt making

Today's post is the last in this weeks series of 7 craft ideas to do with children. This post will show you how to use wool balls to make a felt picture. For this activity children will have to contemplate design, use of colour, composition and function of the piece.
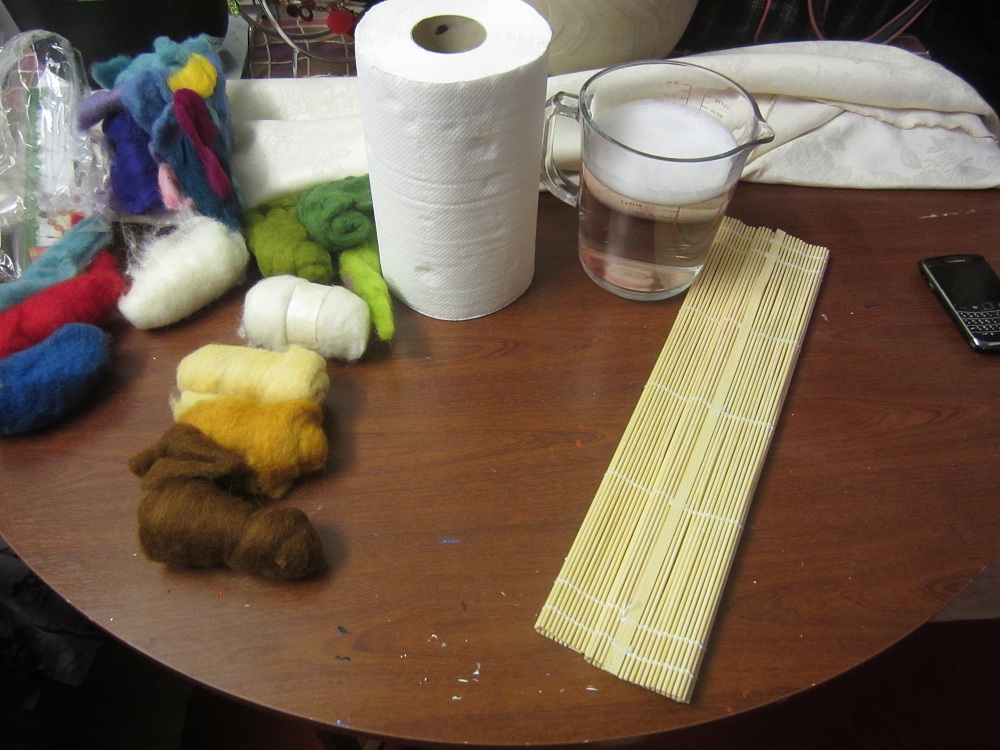
You will need: a bamboo mat, felt wool, tissue paper, a bowl of soapy water and embellishments such as glitter glue and thread
 Completed Felt picture of a reindeer
 1. Make sure you have a clear working area and have all your materials ready
 2. I would normally get the children to plan out their design on paper first. This provides children the opportunity to work out colour choices and composition. Once they have planned their design they are ready to start.
3. Lay a piece of tissue paper on the table ready to start adding your felt picture. Select your colour wool and gently tease the wool apart to create thin layers. Make sure you do not pull the felt too thin as this will leave gaps.
 4. Continue building up the picture by adding pieces of wool gently overlapping each piece
 5. Once you have completed your picture you are ready to bond the wool together to make your felt picture
 6. Place some tissue paper over the top of the felt picture, be careful not to move any parts (you can use net curtain instead of tissue paper which works better as tissue paper can tear if the children rub too hard). Very gently use you hand to dampen the tissue paper using a mixture of soapy water.
 7. Gently rub over the top of the tissue paper, the soapy mixture soaks into the fibres of the wool. when you rub over the top the mixture will sud up and start to bind the fibre together.
 8. When you have rubbed over the top and the felt has flattened you should be able to pick the piece up and turn it over. Make sure you are careful when turning the piece over as the fibres will not have completely bonded yet.
 9. Repeat the process on the back, lay some more tissue paper over the top and rub over the back of the felt picture. Remember to rub firmly but with care. The soapy mixture needs to mix into all the fibres for the piece to bind together to form your felt picture - this process can take up to ten minutes.
 10. Gently peel off the back layer of tissue paper to reveal your felt picture. The felt should stay on the remaining tissue paper, if it is attached to the piece of tissue you are pulling off then you need to continue rubbing the fibre together. Once you have taken the back layer of tissue paper off, lay the felt onto a bamboo mat.

 11. Peel off the remaining piece of tissue paper
 12. Roll the picture in the bamboo mat
 13. Roll the picture tightly in the mat, keep rolling and squeeze the bamboo mat as you are rolling. This squeezes the water from out of the felt material and finally binds all the fibres together. Keep unrolling the mat and then rolling it back up again until you have hardly any suds or water coming out. This should take 5-10 minutes
 14. When you have rolled the picture for about 10 minutes, take it out of the mat and leave it to dry for 24 hours
 15. Once the piece is dry it is time to embellish the piece. I have decided to embroider on the reindeer's antlers using cross stitch silks.
16. For a final touch I have used glitter glue for Rudolph's nose and spot on my reindeer's back. You could also add sequins, buttons, beads feather etc etc

This is a perfect activity to invite parents and carers into school to help out with. Key stage one children can design their picture on paper and then select the felt material. Young children should be able to tear off pieces of felt and lay then down to create their pictures. Parents can help with the binding and rolling part. A lovely activity for a fun Christmas craft afternoon.

Key stage 2 can think about what function the piece will have once it has been made. If it is going to be framed to create a wall hanging, sewn on a bag as a interest panel or even add a fabric stiffener and create a sculptural piece. Key Stage 2 children should be considering composition and use of colour throughout the making process.

Felt making workshops are available for schools clubs and organisations, if you are interested please contact me on lisamart@hotmail.co.uk

Saturday, 19 November 2011

Christmas Craft No 6 - Christmas Cancer Ribbons

For those of you that follow me on my blog, facebook or twitter, you will be aware that my Mother and Sister are both battling cancer. So for day 6 of my Christmas Crafts 7 day challenge I wanted to make something that promotes awareness as well as celebrate how proud I am of both of them. The solution - felt Christmas cancer ribbon brooches.
To make these you will need:
Felt material in multi colours, pencil, sewing thread, needles, scissors and a ribbon template. I have sewn safety pins on the back for attaching but you can purchase a range of backing from a good haberdashery or market stall.

Cut out the template and draw around this using a pencil on a piece of pink felt (or the colour of your choice. You will find a list of all the different colour ribbons on this website http://www.cancer-services.com/cancer_awareness.asp) You will need to cut out two ribbons - to save time you can fold the felt material in half and cut two out together. Next decide if you are going to embroider any words or images on your ribbon, as this will need to be completed before the two ribbons are sewn together. I have chosen to use the "Live Laugh Love" motto and embroidered this on each ribbon in black so that it is clear to read. You could embroider someones names or a message of thanks, hope or support. On the middle ribbon in the picture below I have embroidered a piece of holly rather than adding on a "Christmas topper".
Once you have completed your embroidery work, sew your ribbons together. I have chosen to use the blanket stitch as I think it give a nice finish. If you are not a confident sewer, you could always use fabric glue and glue the pieces together. I would avoid using PVA glue as this can make the fabric messy, dries hard on the fabric and makes it impossible to sew if you change your mind.
On the other ribbons I have added a Christmas toppers such as a snowman, a Christmas tree, a Christmas bell and Santa's Hat. I did not make any templates for these, just cutting the required shapes from the felt material - This has always been my working process. If you find this a bit tough, there are numerous websites that have templates that you can shrink down on a photocopier to the size required have a look on http://daniellesplace.com/html/paper_dolls.html for some fab ideas- if you get really stuck let me know and I will post a template or two.
I have added a picture of the ribbon template I used to make the ones pictured below. Your finished pieces do not have to end up as brooches, why not make some unique tree decorations, a Christmas banner or add some perfume for a car freshner.

 The set of Felt ribbons, with the "live, Laugh, Love" motto sewn on them.
 The template I used to cut out the ribbon from pink felt material
 Close up of Felt "Christmas Bell" Ribbon
 Close up of "Santa's Hat" ribbon
 Close up of embroidered "Holly" ribbon
 Close up of "Snowman" ribbon
Close up of "Christmas Tree" ribbon

So get your needle and thread out and have a go at making your own unique Christmas ribbon brooch/or tree decoration.

Cancer Research UK is the world's leading charity dedicated to beating cancer through research. Why not have a look at some of the beautiful items you can purchase for gifts this year on the Cancer Research website http://www.cancerresearchuk.org/ and see how you can help make a difference to thousands of peoples lives