Search This Blog

Welcome to my blog
Showing posts with label Children's Christmas Crafts. Show all posts

Friday, 7 December 2012

Paper Christmas Tree

Wobbly Paper Christmas Trees

The final instalment of our five days of Christmas brings you these adorable paper Christmas Trees.
Brief Description: Using a simple paper rolling technique you will learn how to make this adorable Christmas tree decoration
Keywords: wrap, roll, coil, cone, spiral, motion, Christmas, tree, sparkle, Glitter, Winter, festival, celebration
Materials Needed: Paper, Pritt Stick, a ruler, embellishments, scissors
Instructions:

  • Select the paper you are going to use to make your tree. This can be coloured paper, paper that has been prepared by the children i.e. drawn, marbled etc, wrapping paper, news paper etc
  • Place a ruler at the corner of the pieces of paper, carefully flip the ruler over so that you are rolling the paper tightly around the ruler.
Make sure you have an equilateral triangle at the corner of the paper before you start rolling
  • Make sure you pull the ruler our slightly if using a 30cm ruler or you will wrap the ruler in the paper making the task difficult.
  • When you have rolled all the paper add a dab of glue on the top corner, fold down to secure. Remove the ruler from the paper.

Make sure you add plenty of glue in the corner to ensure the  paper does not unfold
  • This will produce a thin rolled piece of paper that you will use to make your tree and base unit.
Once you have rolled you paper run the ruler over the top to flatten the paper
  • Make 10 green rolls of paper and 10 red rolls of paper
  • When you have got all ten pieces you need to coil them together to make a large spiral shape. Start off with one strip and roll into a spiral as tightly as you can, secure the end with a piece of glue.
Once again add lots of glue each time you add a new strip of paper, this will give you a stringer structure
  • Continue to add the remaining nine strips of paper until you have a coil. It is important to keep this coil as tight as possible.
Your coil needs to be nice and tight but not too tight that you cannot move the sections
  • Lay a piece of green paper on the desk in a landscape position. Very carefully roll this as tightly as you can to form a straw like shape. Secure the edge with some glue. This will make the pole for the tree to rest on.
Roll a piece of A4 paper to make your stand for your wobbly tree
  • Repeat the process of making a coil as shown above using the green strips, but this time add the central pole (the strawlike tube from point 9) and wrap the red strips around the central pole. Add each strip as above to create a coil. This will form the base and stand for your tree shape.
Wrap red paper around the straw nice and tight as above

Wobbly Christmas tree stand
  • Carefully, using your thumbs, push out the centre of your green coil, you should start to form a cone shape. Keep pushing until you create the desired shape.
The coil pushed out to make your wobbly tree
  • Once the cone is at the correct size, gently place this onto of the central beam to create your wobbly tree.
The finished trees
  • Embellish with glitter, sequins, beads etc
Differentiation:
Key stage 1: Instead of using a ruler, Key Stage 1 pupils could roll the paper with their hands to make the strips for the tree. These can then be stapled together with adults help to create a cone shape, coiling and stapling as described above. Children can then decorate or paint the pieces.

Key Stage 2: Explore what happens if you use 20 strips or more, How big can you make your tree?
Gifted and Talented: Explore what else you can make using this technique, What happens if you put two cone shapes together or inside each other? What happens if you use a slightly thicker ruler? What happened if you shorten the support beam?  

if you have enjoyed these crafts and would like to find out more about children or adult art classes please contact Lisa Smith at the_laboratory@hotmail.co.uk

Thursday, 6 December 2012

Christmas Paper Wreaths

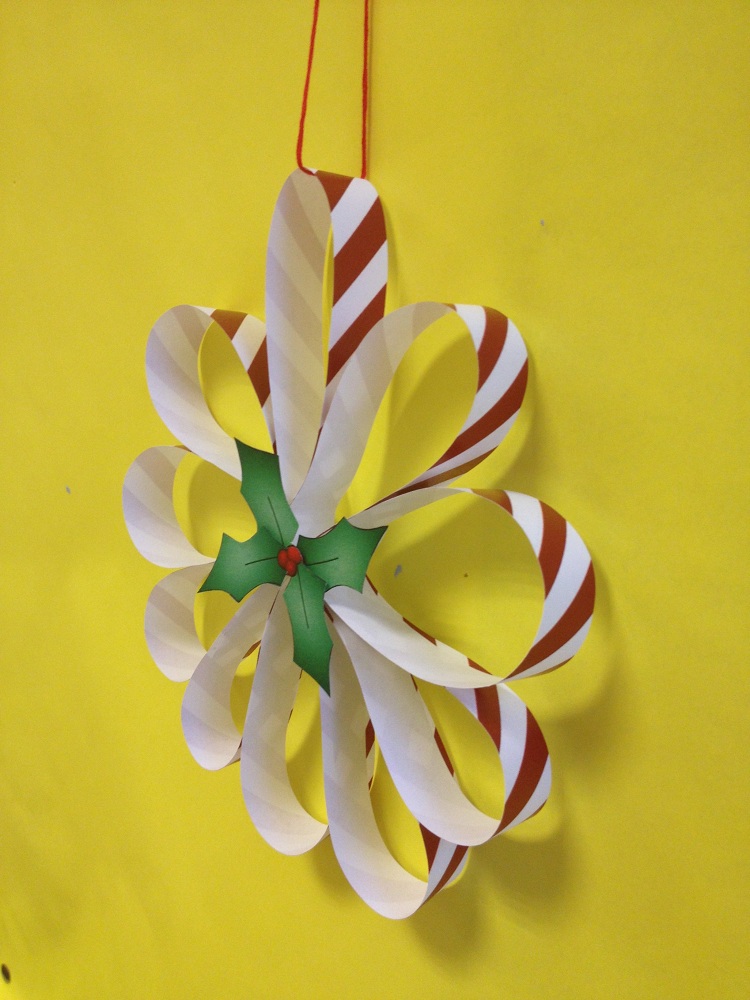
Candy cane inspired paper wreath
Day four brings you two crafting activities for the price of one, an attractive and easy paper wreath and the good old fashioned paper chains.
Brief Description:  This is a simple but effective decoration that looks great hanging from the ceiling, the wall or as part of a wall display. This is also a good activity to look at shape, pattern and symmetry.

Keywords: Pattern, strip, Christmas, festival, winter, decoration, flexibility, shape, design
Materials Needed: Paper, felt tip pens, scissors, crimping scissors, ribbon, glue, embellishments
Instructions:

  • Cut ten strips of paper from a coloured/ patterned piece of paper. This could be a piece of wrapping paper, a page from a magazine or some brightly painted paper prepared by the children.
You can match all your paper or mix up the designs to create a stunning festive wreath
  • Glue each strip into a circle shape
make circles from all the strips of paper
  • Repeat this to all strips leaving you with 10 circles
When you have all your circles made, you are ready to make your wreath

  • Glue two circles together using a pritt stick, Add another two circles either side of the first two circles to make a flower shape
Start making your wreath by gluing two circles together
  • Keep adding the remaining circles in between two circles to complete the circle form
Gradually add the circle together to form a circle

All ten circles added together
  • Finally add a central embellishment such a holly, father Christmas, and angel, a snowman etc to complete your decoration
I've added holly and ivy in the middle of mine but you can add any image
  • Place on display
Key stage 1: Instead of cutting out the strips to make the decoration, children can use pre-cut strips from paper chain packs or strips prepared in class.

Key stage 2: Consider using crimping scissors to add an interesting edge to your decoration. You could also try using various hole punches to cut out shapes in each strip.
Gifted and Talented: Think of different shapes that you can use. What will the decoration look like using triangles attached together? What patterns can you create? How would you add squares to each? What about mixing shapes and placing shapes inside each other. Experiment, explore and create.
Alternate idea

Make paper chains
This idea can easily be adapted to make your own paper chains using strips of brightly coloured and patterned paper. You can use any paper to make your chains, magazines, comics, wrapping paper or even paper that has been painted and prepared by the children


  •   Make a circle out of a strip of paper as shown in the diagram by gluing both ends together.


Thread the paper through the circle 
  • Thread another strip through the centre on the circle made in step 1.
Glue the end of the paper together to start making your chain
  • Make this strip into a circle as shown in step 1 by gluing both ends together.

When you have finished your chain use it to decorate your room, tree, window etc.

  • Continue repeating this process until your paper chain is at the desired length.

Wednesday, 5 December 2012

Felt Christmas Decorations


Activity 3 in our five days of Christmas brings you these lovely felt Christmas Decorations. 
Christmas Pudding brooch
Brief Description: These are cute little decorations which look great as badges, keyrings, mobile phone dangles or as Christmas tree decorations. These give children the opportunity to explore their sewing skills but can be adapted for younger children using either felt or funky foam.
Keywords: Sewing, stitching, felt, brooch, Christmas, festival, winter, decoration
Materials Needed: Felt (or funky foam), needles, thread, glitter glue, scissors, badge pin/keyring/mobile phone dangle
Instructions:
  • Using funky foam of felt material cut out all the different sections required for your decoration. Draw out your design on a piece of paper and carefully consider what shapes and colours you require. For younger children you can have the pieces pre cut or prepare a template ready for children to draw around.

Prepare all the pieces of felt before you start sewing together
  • For the pudding, the first parts to be sewn together are the brown circles which make up the core of the image. Using a blanket stitch, stitch all around the circles. You can use any stitch you like but I think the blanket stitch leaves a nice finish.

Sew on the custard
  • Next add the “custard” on this is stitched onto the pudding using the same stitch.

Make sure you use the same stitch all the way around the brooch
  • Add your final decoration pieces to the pudding such as holly at the top and the black currant spots. These can be stitched on or adhered using pva or a fabric glue.
All on details such as currant and holly
  • Finally glue or stitch your brooch back to the back of the pudding. If you are using a keyring fixing, stitch this on the top of the decoration or if you want to place you pudding on a tree, leave a loop of thread at the top of the pudding.
Glue or sew on a brooch back

Here are some examples of other badges, decorations ready to be made

Completed Robin brooch

Completed Penguin Brooch


Differentiation:
Key Stage 1: Key stage one children might find these a little difficult to sew, but there are options to make this more adaptable. If you have the time you can use a hole punch and make holes around the outside of the felt/funky foam and younger children can sew the pieces together with a tapestry needle and wool. Obviously this takes a lot of time in the preparation stages, so planning ahead is vital. Alternatively children can draw and cut to the best of their abilities around templates. These can be cut out with the help of an adult and then the pieces can be glued together rather than sewn.
Key Stage 2: Using patterns or pictures as guides, key stage 2 pupils should be able to use a template and cut around this to acquire all the shapes and piece for their decoration. Once again key stage 2 children can sew the main body of the piece together and glue the additional pieces to the decoration for speed. Why not have the children make a couple of decorations and sell them at the school fete?
Gifted and Talented: Gifted and Talented pupils could play around with creating their own designs and making their own templates. Encourage the children to look carefully at the theme they are going to make, i.e a robin. What are the main parts they will need? what are the shapes? how many pieces? what size is your decoration going to be? Look at the size of the wings on the robin compared with the body, the beak, the eye and so on and so forth. Think about scale, character, colour and adding your own unique finish. 

Monday, 3 December 2012

Christmas Collage

Welcome to five days of Christmas Crafts for all ages. These have all been differentiated for Key Stage 1 and Key Stage 2 but are also lots of fun for adults.
Christmas Collage
Brief Description:
Students will exercise their scissor-skills, learn about spatial awareness and design whilst they create vintage style collage.
Keywords:
Collage, Space, Balance, Design, Complimentary, Christmas, Journey, Sparkle, Space, Travel, Winter, festival, celebration
Materials Needed:
Paper, card, pencil, Coloured printed Christmas themed paper/ or hand draw designs, glitter or glitter glue, ribbon, vintage image of favourite place or sepia photograph, scissors

Instructions:

  • On a piece of paper, plan out the design of your collage. Think about your favourite place you would like to visit at Christmas it could be a country, a favourite spot at a park or even grandmas sofa.
  • You will need to decide what image you are going to collage on top of your favourite place. I have chosen a Christmas tree but you could use an angel, a star, the nativity, a bauble etc.
  • Collect all of your images. Be careful if you are using the Internet to look for images, shutter stock has some great images that you can use for a small charge. Alternatively you can collect your images from magazines, newspaper, photographs, wrapping paper, Christmas cards etc.
  • I have decided to create my collage in a square shape but again, you can create your collage to any shape or size. Cut out your image of your favourite place to the size and shape required. Mount this picture onto a piece of brightly coloured paper to give you’re your base for your collage.
  • Carefully mark on the back of your image to be collaged on top of your base. Cut along these lines with care. Think about how you are going to space these on your collage.

  • Cut along the lines you have marked on the piece of paper


  • Glue the pieces in place on top of your base.


  • Add any additional detail to your collage, I have added a star on the top of my tree and a line of glitter glue on each shape.


  • The date has been added to the collage using glitter glue.


 For a final touch print off or create a wish list for Santa. Roll this into a scroll and secure with a piece of ribbon


  • Glue the scroll onto the collage

Differentiation:
Key stage 1: You can use pre cut shapes or templates for younger children to colour and cut out. This is a great activity to practice scissor skills, however why not have the children rip and tear the images out giving your rough edges – adding to the effect. Painted hand prints with a red dot on the middle finger and a squiggly off the thumb makes a great reindeer – give it a try.
Key stage 2: Why not extend the collage by adding additional layers that can hang from the central section? This can be done by cello taping another shape to the bottom of the shape above. Once again you have to carefully think about weight distribution and balance. If you make one side to heavy the collage will tilt when hung. Instead of using string why not use pipecleaners to attach the hanging images. You can bend the pipecleaners into lots of different positions so the hanging images don’t all hang in the same direction.
An alternative method of adhering the hanging images to the central image could be to use a hole punch and tie the hanging images in place using wool.

Gifted and Talented: Think about the use of symmetry with the Collage. Imagine there is a mirror held in the centre on the image, both sides should look alike and mirror each other.
Consider additional impact such as cutting out the windows from buildings house, having a door that opens, a star that lifts to reveal a message etc to create areas of interest to your collage and make it stand out.

For more information on arts and craft classes for all ages contact Lisa Smith at the_laboratory@hotmail.co.uk

Sunday, 27 November 2011

Children's Christmas Crafts no 7 - Felt making

Today's post is the last in this weeks series of 7 craft ideas to do with children. This post will show you how to use wool balls to make a felt picture. For this activity children will have to contemplate design, use of colour, composition and function of the piece.
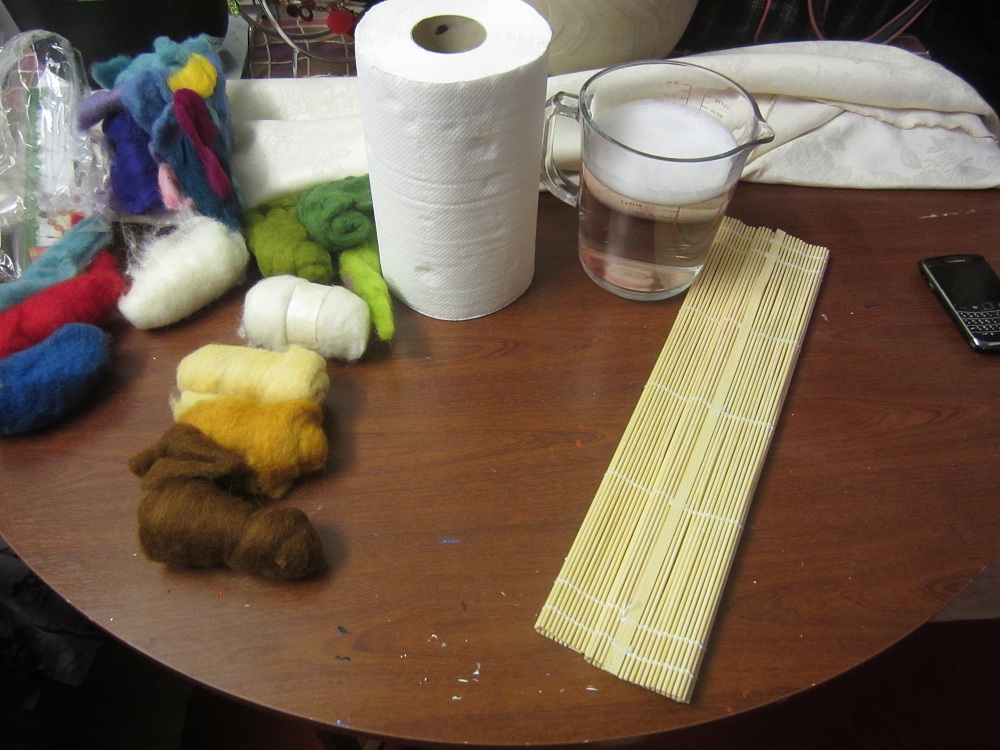
You will need: a bamboo mat, felt wool, tissue paper, a bowl of soapy water and embellishments such as glitter glue and thread
 Completed Felt picture of a reindeer
 1. Make sure you have a clear working area and have all your materials ready
 2. I would normally get the children to plan out their design on paper first. This provides children the opportunity to work out colour choices and composition. Once they have planned their design they are ready to start.
3. Lay a piece of tissue paper on the table ready to start adding your felt picture. Select your colour wool and gently tease the wool apart to create thin layers. Make sure you do not pull the felt too thin as this will leave gaps.
 4. Continue building up the picture by adding pieces of wool gently overlapping each piece
 5. Once you have completed your picture you are ready to bond the wool together to make your felt picture
 6. Place some tissue paper over the top of the felt picture, be careful not to move any parts (you can use net curtain instead of tissue paper which works better as tissue paper can tear if the children rub too hard). Very gently use you hand to dampen the tissue paper using a mixture of soapy water.
 7. Gently rub over the top of the tissue paper, the soapy mixture soaks into the fibres of the wool. when you rub over the top the mixture will sud up and start to bind the fibre together.
 8. When you have rubbed over the top and the felt has flattened you should be able to pick the piece up and turn it over. Make sure you are careful when turning the piece over as the fibres will not have completely bonded yet.
 9. Repeat the process on the back, lay some more tissue paper over the top and rub over the back of the felt picture. Remember to rub firmly but with care. The soapy mixture needs to mix into all the fibres for the piece to bind together to form your felt picture - this process can take up to ten minutes.
 10. Gently peel off the back layer of tissue paper to reveal your felt picture. The felt should stay on the remaining tissue paper, if it is attached to the piece of tissue you are pulling off then you need to continue rubbing the fibre together. Once you have taken the back layer of tissue paper off, lay the felt onto a bamboo mat.

 11. Peel off the remaining piece of tissue paper
 12. Roll the picture in the bamboo mat
 13. Roll the picture tightly in the mat, keep rolling and squeeze the bamboo mat as you are rolling. This squeezes the water from out of the felt material and finally binds all the fibres together. Keep unrolling the mat and then rolling it back up again until you have hardly any suds or water coming out. This should take 5-10 minutes
 14. When you have rolled the picture for about 10 minutes, take it out of the mat and leave it to dry for 24 hours
 15. Once the piece is dry it is time to embellish the piece. I have decided to embroider on the reindeer's antlers using cross stitch silks.
16. For a final touch I have used glitter glue for Rudolph's nose and spot on my reindeer's back. You could also add sequins, buttons, beads feather etc etc

This is a perfect activity to invite parents and carers into school to help out with. Key stage one children can design their picture on paper and then select the felt material. Young children should be able to tear off pieces of felt and lay then down to create their pictures. Parents can help with the binding and rolling part. A lovely activity for a fun Christmas craft afternoon.

Key stage 2 can think about what function the piece will have once it has been made. If it is going to be framed to create a wall hanging, sewn on a bag as a interest panel or even add a fabric stiffener and create a sculptural piece. Key Stage 2 children should be considering composition and use of colour throughout the making process.

Felt making workshops are available for schools clubs and organisations, if you are interested please contact me on lisamart@hotmail.co.uk