Search This Blog

Welcome to my blog
Showing posts with label Paper crafts. Show all posts

Friday, 7 December 2012

Paper Christmas Tree

Wobbly Paper Christmas Trees

The final instalment of our five days of Christmas brings you these adorable paper Christmas Trees.
Brief Description: Using a simple paper rolling technique you will learn how to make this adorable Christmas tree decoration
Keywords: wrap, roll, coil, cone, spiral, motion, Christmas, tree, sparkle, Glitter, Winter, festival, celebration
Materials Needed: Paper, Pritt Stick, a ruler, embellishments, scissors
Instructions:

  • Select the paper you are going to use to make your tree. This can be coloured paper, paper that has been prepared by the children i.e. drawn, marbled etc, wrapping paper, news paper etc
  • Place a ruler at the corner of the pieces of paper, carefully flip the ruler over so that you are rolling the paper tightly around the ruler.
Make sure you have an equilateral triangle at the corner of the paper before you start rolling
  • Make sure you pull the ruler our slightly if using a 30cm ruler or you will wrap the ruler in the paper making the task difficult.
  • When you have rolled all the paper add a dab of glue on the top corner, fold down to secure. Remove the ruler from the paper.

Make sure you add plenty of glue in the corner to ensure the  paper does not unfold
  • This will produce a thin rolled piece of paper that you will use to make your tree and base unit.
Once you have rolled you paper run the ruler over the top to flatten the paper
  • Make 10 green rolls of paper and 10 red rolls of paper
  • When you have got all ten pieces you need to coil them together to make a large spiral shape. Start off with one strip and roll into a spiral as tightly as you can, secure the end with a piece of glue.
Once again add lots of glue each time you add a new strip of paper, this will give you a stringer structure
  • Continue to add the remaining nine strips of paper until you have a coil. It is important to keep this coil as tight as possible.
Your coil needs to be nice and tight but not too tight that you cannot move the sections
  • Lay a piece of green paper on the desk in a landscape position. Very carefully roll this as tightly as you can to form a straw like shape. Secure the edge with some glue. This will make the pole for the tree to rest on.
Roll a piece of A4 paper to make your stand for your wobbly tree
  • Repeat the process of making a coil as shown above using the green strips, but this time add the central pole (the strawlike tube from point 9) and wrap the red strips around the central pole. Add each strip as above to create a coil. This will form the base and stand for your tree shape.
Wrap red paper around the straw nice and tight as above

Wobbly Christmas tree stand
  • Carefully, using your thumbs, push out the centre of your green coil, you should start to form a cone shape. Keep pushing until you create the desired shape.
The coil pushed out to make your wobbly tree
  • Once the cone is at the correct size, gently place this onto of the central beam to create your wobbly tree.
The finished trees
  • Embellish with glitter, sequins, beads etc
Differentiation:
Key stage 1: Instead of using a ruler, Key Stage 1 pupils could roll the paper with their hands to make the strips for the tree. These can then be stapled together with adults help to create a cone shape, coiling and stapling as described above. Children can then decorate or paint the pieces.

Key Stage 2: Explore what happens if you use 20 strips or more, How big can you make your tree?
Gifted and Talented: Explore what else you can make using this technique, What happens if you put two cone shapes together or inside each other? What happens if you use a slightly thicker ruler? What happened if you shorten the support beam?  

if you have enjoyed these crafts and would like to find out more about children or adult art classes please contact Lisa Smith at the_laboratory@hotmail.co.uk

Thursday, 6 December 2012

Christmas Paper Wreaths

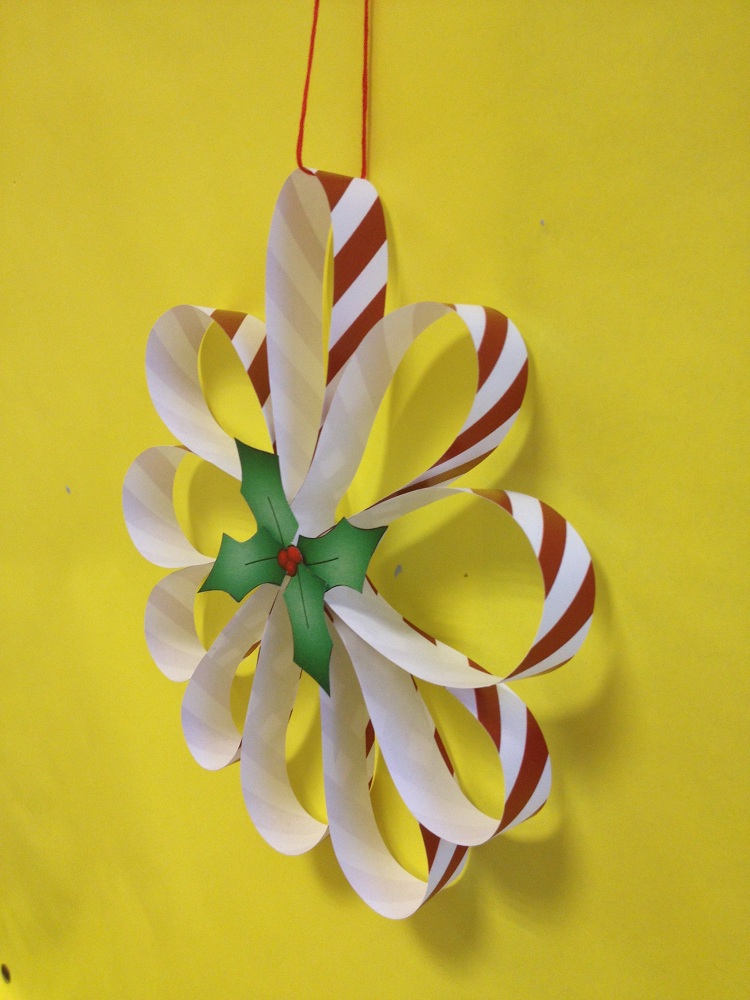
Candy cane inspired paper wreath
Day four brings you two crafting activities for the price of one, an attractive and easy paper wreath and the good old fashioned paper chains.
Brief Description:  This is a simple but effective decoration that looks great hanging from the ceiling, the wall or as part of a wall display. This is also a good activity to look at shape, pattern and symmetry.

Keywords: Pattern, strip, Christmas, festival, winter, decoration, flexibility, shape, design
Materials Needed: Paper, felt tip pens, scissors, crimping scissors, ribbon, glue, embellishments
Instructions:

  • Cut ten strips of paper from a coloured/ patterned piece of paper. This could be a piece of wrapping paper, a page from a magazine or some brightly painted paper prepared by the children.
You can match all your paper or mix up the designs to create a stunning festive wreath
  • Glue each strip into a circle shape
make circles from all the strips of paper
  • Repeat this to all strips leaving you with 10 circles
When you have all your circles made, you are ready to make your wreath

  • Glue two circles together using a pritt stick, Add another two circles either side of the first two circles to make a flower shape
Start making your wreath by gluing two circles together
  • Keep adding the remaining circles in between two circles to complete the circle form
Gradually add the circle together to form a circle

All ten circles added together
  • Finally add a central embellishment such a holly, father Christmas, and angel, a snowman etc to complete your decoration
I've added holly and ivy in the middle of mine but you can add any image
  • Place on display
Key stage 1: Instead of cutting out the strips to make the decoration, children can use pre-cut strips from paper chain packs or strips prepared in class.

Key stage 2: Consider using crimping scissors to add an interesting edge to your decoration. You could also try using various hole punches to cut out shapes in each strip.
Gifted and Talented: Think of different shapes that you can use. What will the decoration look like using triangles attached together? What patterns can you create? How would you add squares to each? What about mixing shapes and placing shapes inside each other. Experiment, explore and create.
Alternate idea

Make paper chains
This idea can easily be adapted to make your own paper chains using strips of brightly coloured and patterned paper. You can use any paper to make your chains, magazines, comics, wrapping paper or even paper that has been painted and prepared by the children


  •   Make a circle out of a strip of paper as shown in the diagram by gluing both ends together.


Thread the paper through the circle 
  • Thread another strip through the centre on the circle made in step 1.
Glue the end of the paper together to start making your chain
  • Make this strip into a circle as shown in step 1 by gluing both ends together.

When you have finished your chain use it to decorate your room, tree, window etc.

  • Continue repeating this process until your paper chain is at the desired length.

Friday, 25 November 2011

Children's Christmas Crafts no 5 - Christmas Weaving

Christmas wouldn't be Christmas without a bit of weaving. And that's exactly what Christmas craft No 5 brings to you. Children love weaving and using this technique to create all types of craft ideas from cards, to tags, to placemats and so forth. These ideas below can be made into lots of different crafts. If you use thin paper you can laminate your finished weaving and create placemats and coasters. This way they can be wiped clean and reused.

You will need card, patterned paper, glue, ribbon and embellishments
 Completed Christmas Weaving

1.     Select a weaving shape in the style of your choice or draw your own shape
2.     Now select your paper you are going to use to weave with. Think about what colours you want, complementary of contrasting. Cut a few strips of each colour. ( you can use anything to weave with including ribbon, bits of plastic, carrier bags, fabric, plastic cutlery, twigs – you can be as adventurous as you want)


3.     You need to make your slats to weave your paper through. You can do this using a craft knife and steal ruler. Carefully make out your slats using a pencil leaving about a 1 cm gap between each slat. Cut along the lines using a craft knife. Alternatively you can make the lines and fold the shape in half and use scissors to cut along the lines (this will leave a fold make in your shape)
4.     Staring from the back of your shape, weave a strip of paper over and under the cut slats. Secure the ends with glue at the back of the shape.

 First row completed


5.     Select your next strip and weave over and under the alternative slats in contrast to the first strip. This will give you a checker board effect. Continue this method until the shape is full.

6.     Make sure all the ends are securely glued down

7.     I have added glitter glue around the edge of my cracker for a bit of sparkle and attached a felt pre cut reindeer either end of the cracker. You could also tie ribbon around the ends, write messages on and embellish with sequins.


The picture above is from a Christmas crafts training session carried out at a local school - The picture shows a Christmas tree that has had pieces of paper weaved through. As you can see the tree has been painted using acrylic green paint and the member of staff has embellished the tree with buttons and glitter glue.

Something completely different tomorrow...