Search This Blog

Welcome to my blog
Showing posts with label the laboratory. Show all posts

Friday, 17 May 2013

My Mother, My Muse

It is with a sad and heavy heart that I write this blog, after a four year battle with cancer my mother passed away peacefully on the 11th May surrounded by her family at St Luke's Hospice. Throughout my mothers painful battle she never stopped encouraging me to follow my dreams, explore my creativity and believe that I could be all that I want to be. 
When I look back over the years I was amazed at how much art work I have created where my mother has been my muse, my inspiration, my motivation and driving force. She has collected bottle tops, cartons, saved her crosswords, modelled for me and collected inspirational images for years - often clogging up her tiny flat all for the sake of art! Never once questioning my motive, just trusting in my judgement.
 One of my earliest memories is of going to a second hand market and being given 50p to purchase some cloth to make something out off.
So it is with this blog that I want to say thank you mum, for being you, for always believing in me and hopefully instilling in me all that you hoped and dreamed of for me, God Bless and sleep tight, love you x

Here are just a few of the many pieces inspired by my mother.
1 up 1 down, M.A Installation

Live, Life, Here M.A Installation

Live Life Here, M.A Installation

What is a Mother, M.A Installation

 Mums Ops, Paper Myths 

My Brave Mum's Survival, Paper Myths

Kinafters and Kinshafters, Paper Myths

Love will see you through, Frottage drawing

Mother Miro, Newspaper, carrier bags and acrylic paint

Detail, My Cup Runneth Over. Newspaper and acrylic paint

My Cup Runneth Over. News paper and acrylic paint

Every Twist and Turn. News paper and acrylic paint

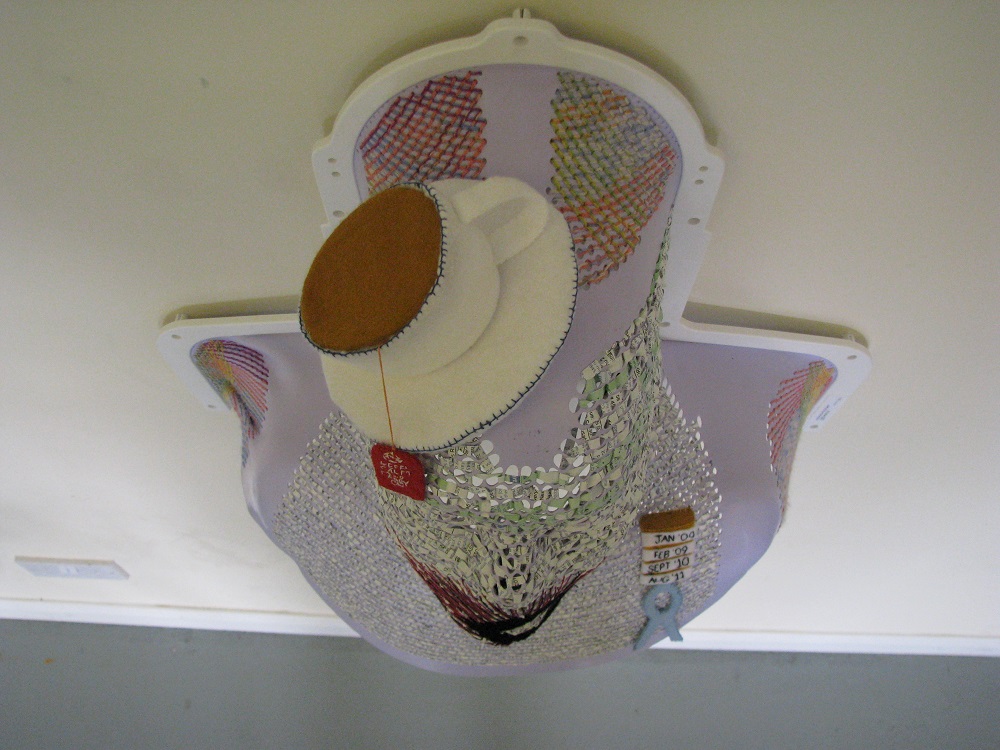
Aerial View, Mothers Mask. Radio Therapy mask, prescriptions, felt, embroidery thread

Side View, Mothers Mask. Radio Therapy mask, prescriptions, felt, embroidery thread

Mothers Mask. Radio Therapy mask, prescriptions, felt, embroidery thread

Side View, Mothers Mask. Radio Therapy mask, prescriptions, felt, embroidery thread

Autumn. Water Soluble Crayon on Paper

Miss you x

Wednesday, 6 February 2013

Love Series

Since January I have been enjoying working in my own studio. I cannot explain how peaceful and happy I feel in my space, creating planning and teaching.
Now that I am all settled in, over the past few days I have been working on a series of drawings ready for an up coming exhibition. I thought I would give you a sneak preview of a few of the drawings.
"I'm Yours" Water Soluble Crayon on paper

"Singing Heart" Water Soluble Crayon on paper
"Love Ice-Cream" Water Soluble Crayon on paper

Framed and mounted drawing

Original drawings will be available priced at £95:00 framed, prints available £45 or £60 framed. For more information contact Lisa at lisamart@hotmail.co.uk

Friday, 7 December 2012

Paper Christmas Tree

Wobbly Paper Christmas Trees

The final instalment of our five days of Christmas brings you these adorable paper Christmas Trees.
Brief Description: Using a simple paper rolling technique you will learn how to make this adorable Christmas tree decoration
Keywords: wrap, roll, coil, cone, spiral, motion, Christmas, tree, sparkle, Glitter, Winter, festival, celebration
Materials Needed: Paper, Pritt Stick, a ruler, embellishments, scissors
Instructions:

  • Select the paper you are going to use to make your tree. This can be coloured paper, paper that has been prepared by the children i.e. drawn, marbled etc, wrapping paper, news paper etc
  • Place a ruler at the corner of the pieces of paper, carefully flip the ruler over so that you are rolling the paper tightly around the ruler.
Make sure you have an equilateral triangle at the corner of the paper before you start rolling
  • Make sure you pull the ruler our slightly if using a 30cm ruler or you will wrap the ruler in the paper making the task difficult.
  • When you have rolled all the paper add a dab of glue on the top corner, fold down to secure. Remove the ruler from the paper.

Make sure you add plenty of glue in the corner to ensure the  paper does not unfold
  • This will produce a thin rolled piece of paper that you will use to make your tree and base unit.
Once you have rolled you paper run the ruler over the top to flatten the paper
  • Make 10 green rolls of paper and 10 red rolls of paper
  • When you have got all ten pieces you need to coil them together to make a large spiral shape. Start off with one strip and roll into a spiral as tightly as you can, secure the end with a piece of glue.
Once again add lots of glue each time you add a new strip of paper, this will give you a stringer structure
  • Continue to add the remaining nine strips of paper until you have a coil. It is important to keep this coil as tight as possible.
Your coil needs to be nice and tight but not too tight that you cannot move the sections
  • Lay a piece of green paper on the desk in a landscape position. Very carefully roll this as tightly as you can to form a straw like shape. Secure the edge with some glue. This will make the pole for the tree to rest on.
Roll a piece of A4 paper to make your stand for your wobbly tree
  • Repeat the process of making a coil as shown above using the green strips, but this time add the central pole (the strawlike tube from point 9) and wrap the red strips around the central pole. Add each strip as above to create a coil. This will form the base and stand for your tree shape.
Wrap red paper around the straw nice and tight as above

Wobbly Christmas tree stand
  • Carefully, using your thumbs, push out the centre of your green coil, you should start to form a cone shape. Keep pushing until you create the desired shape.
The coil pushed out to make your wobbly tree
  • Once the cone is at the correct size, gently place this onto of the central beam to create your wobbly tree.
The finished trees
  • Embellish with glitter, sequins, beads etc
Differentiation:
Key stage 1: Instead of using a ruler, Key Stage 1 pupils could roll the paper with their hands to make the strips for the tree. These can then be stapled together with adults help to create a cone shape, coiling and stapling as described above. Children can then decorate or paint the pieces.

Key Stage 2: Explore what happens if you use 20 strips or more, How big can you make your tree?
Gifted and Talented: Explore what else you can make using this technique, What happens if you put two cone shapes together or inside each other? What happens if you use a slightly thicker ruler? What happened if you shorten the support beam?  

if you have enjoyed these crafts and would like to find out more about children or adult art classes please contact Lisa Smith at the_laboratory@hotmail.co.uk

Thursday, 6 December 2012

Christmas Paper Wreaths

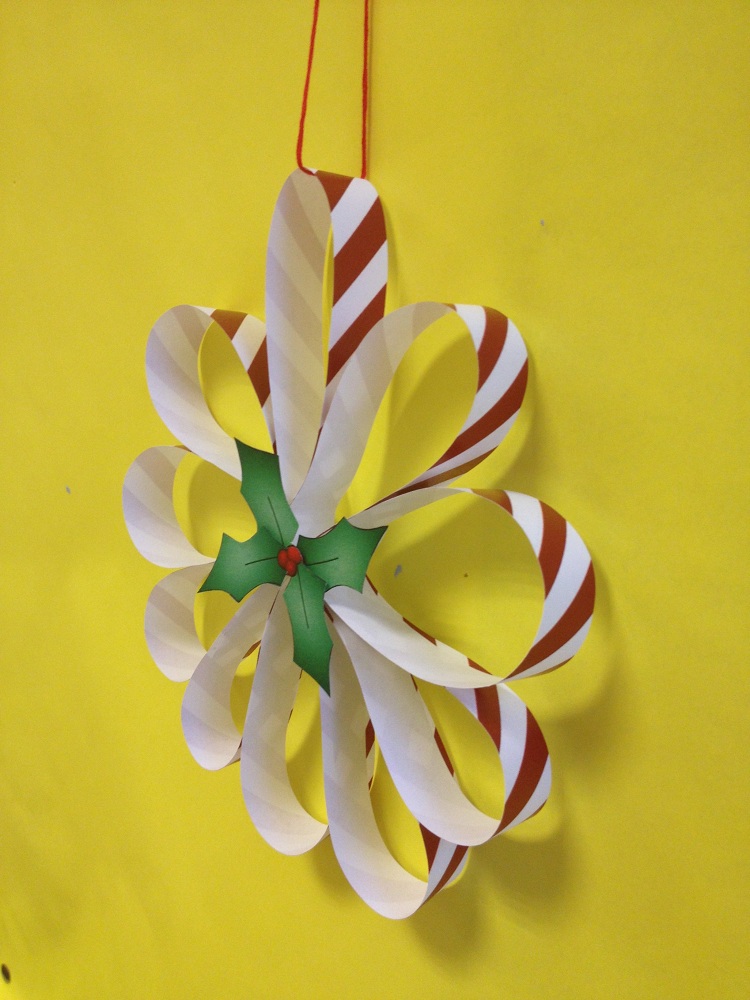
Candy cane inspired paper wreath
Day four brings you two crafting activities for the price of one, an attractive and easy paper wreath and the good old fashioned paper chains.
Brief Description:  This is a simple but effective decoration that looks great hanging from the ceiling, the wall or as part of a wall display. This is also a good activity to look at shape, pattern and symmetry.

Keywords: Pattern, strip, Christmas, festival, winter, decoration, flexibility, shape, design
Materials Needed: Paper, felt tip pens, scissors, crimping scissors, ribbon, glue, embellishments
Instructions:

  • Cut ten strips of paper from a coloured/ patterned piece of paper. This could be a piece of wrapping paper, a page from a magazine or some brightly painted paper prepared by the children.
You can match all your paper or mix up the designs to create a stunning festive wreath
  • Glue each strip into a circle shape
make circles from all the strips of paper
  • Repeat this to all strips leaving you with 10 circles
When you have all your circles made, you are ready to make your wreath

  • Glue two circles together using a pritt stick, Add another two circles either side of the first two circles to make a flower shape
Start making your wreath by gluing two circles together
  • Keep adding the remaining circles in between two circles to complete the circle form
Gradually add the circle together to form a circle

All ten circles added together
  • Finally add a central embellishment such a holly, father Christmas, and angel, a snowman etc to complete your decoration
I've added holly and ivy in the middle of mine but you can add any image
  • Place on display
Key stage 1: Instead of cutting out the strips to make the decoration, children can use pre-cut strips from paper chain packs or strips prepared in class.

Key stage 2: Consider using crimping scissors to add an interesting edge to your decoration. You could also try using various hole punches to cut out shapes in each strip.
Gifted and Talented: Think of different shapes that you can use. What will the decoration look like using triangles attached together? What patterns can you create? How would you add squares to each? What about mixing shapes and placing shapes inside each other. Experiment, explore and create.
Alternate idea

Make paper chains
This idea can easily be adapted to make your own paper chains using strips of brightly coloured and patterned paper. You can use any paper to make your chains, magazines, comics, wrapping paper or even paper that has been painted and prepared by the children


  •   Make a circle out of a strip of paper as shown in the diagram by gluing both ends together.


Thread the paper through the circle 
  • Thread another strip through the centre on the circle made in step 1.
Glue the end of the paper together to start making your chain
  • Make this strip into a circle as shown in step 1 by gluing both ends together.

When you have finished your chain use it to decorate your room, tree, window etc.

  • Continue repeating this process until your paper chain is at the desired length.

Wednesday, 5 December 2012

Felt Christmas Decorations


Activity 3 in our five days of Christmas brings you these lovely felt Christmas Decorations. 
Christmas Pudding brooch
Brief Description: These are cute little decorations which look great as badges, keyrings, mobile phone dangles or as Christmas tree decorations. These give children the opportunity to explore their sewing skills but can be adapted for younger children using either felt or funky foam.
Keywords: Sewing, stitching, felt, brooch, Christmas, festival, winter, decoration
Materials Needed: Felt (or funky foam), needles, thread, glitter glue, scissors, badge pin/keyring/mobile phone dangle
Instructions:
  • Using funky foam of felt material cut out all the different sections required for your decoration. Draw out your design on a piece of paper and carefully consider what shapes and colours you require. For younger children you can have the pieces pre cut or prepare a template ready for children to draw around.

Prepare all the pieces of felt before you start sewing together
  • For the pudding, the first parts to be sewn together are the brown circles which make up the core of the image. Using a blanket stitch, stitch all around the circles. You can use any stitch you like but I think the blanket stitch leaves a nice finish.

Sew on the custard
  • Next add the “custard” on this is stitched onto the pudding using the same stitch.

Make sure you use the same stitch all the way around the brooch
  • Add your final decoration pieces to the pudding such as holly at the top and the black currant spots. These can be stitched on or adhered using pva or a fabric glue.
All on details such as currant and holly
  • Finally glue or stitch your brooch back to the back of the pudding. If you are using a keyring fixing, stitch this on the top of the decoration or if you want to place you pudding on a tree, leave a loop of thread at the top of the pudding.
Glue or sew on a brooch back

Here are some examples of other badges, decorations ready to be made

Completed Robin brooch

Completed Penguin Brooch


Differentiation:
Key Stage 1: Key stage one children might find these a little difficult to sew, but there are options to make this more adaptable. If you have the time you can use a hole punch and make holes around the outside of the felt/funky foam and younger children can sew the pieces together with a tapestry needle and wool. Obviously this takes a lot of time in the preparation stages, so planning ahead is vital. Alternatively children can draw and cut to the best of their abilities around templates. These can be cut out with the help of an adult and then the pieces can be glued together rather than sewn.
Key Stage 2: Using patterns or pictures as guides, key stage 2 pupils should be able to use a template and cut around this to acquire all the shapes and piece for their decoration. Once again key stage 2 children can sew the main body of the piece together and glue the additional pieces to the decoration for speed. Why not have the children make a couple of decorations and sell them at the school fete?
Gifted and Talented: Gifted and Talented pupils could play around with creating their own designs and making their own templates. Encourage the children to look carefully at the theme they are going to make, i.e a robin. What are the main parts they will need? what are the shapes? how many pieces? what size is your decoration going to be? Look at the size of the wings on the robin compared with the body, the beak, the eye and so on and so forth. Think about scale, character, colour and adding your own unique finish.