Search This Blog

Welcome to my blog

Sunday 27 November 2011

Children's Christmas Crafts no 7 - Felt making

Today's post is the last in this weeks series of 7 craft ideas to do with children. This post will show you how to use wool balls to make a felt picture. For this activity children will have to contemplate design, use of colour, composition and function of the piece.
You will need: a bamboo mat, felt wool, tissue paper, a bowl of soapy water and embellishments such as glitter glue and thread
 Completed Felt picture of a reindeer
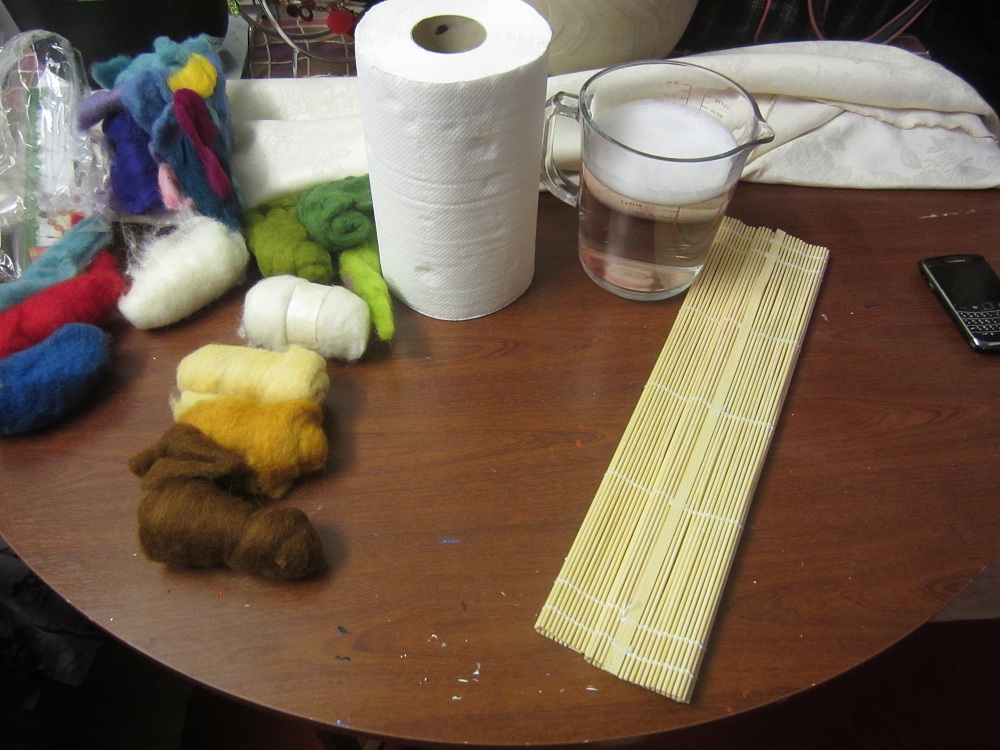
 1. Make sure you have a clear working area and have all your materials ready
 2. I would normally get the children to plan out their design on paper first. This provides children the opportunity to work out colour choices and composition. Once they have planned their design they are ready to start.
3. Lay a piece of tissue paper on the table ready to start adding your felt picture. Select your colour wool and gently tease the wool apart to create thin layers. Make sure you do not pull the felt too thin as this will leave gaps.
 4. Continue building up the picture by adding pieces of wool gently overlapping each piece
 5. Once you have completed your picture you are ready to bond the wool together to make your felt picture
 6. Place some tissue paper over the top of the felt picture, be careful not to move any parts (you can use net curtain instead of tissue paper which works better as tissue paper can tear if the children rub too hard). Very gently use you hand to dampen the tissue paper using a mixture of soapy water.
 7. Gently rub over the top of the tissue paper, the soapy mixture soaks into the fibres of the wool. when you rub over the top the mixture will sud up and start to bind the fibre together.
 8. When you have rubbed over the top and the felt has flattened you should be able to pick the piece up and turn it over. Make sure you are careful when turning the piece over as the fibres will not have completely bonded yet.
 9. Repeat the process on the back, lay some more tissue paper over the top and rub over the back of the felt picture. Remember to rub firmly but with care. The soapy mixture needs to mix into all the fibres for the piece to bind together to form your felt picture - this process can take up to ten minutes.
 10. Gently peel off the back layer of tissue paper to reveal your felt picture. The felt should stay on the remaining tissue paper, if it is attached to the piece of tissue you are pulling off then you need to continue rubbing the fibre together. Once you have taken the back layer of tissue paper off, lay the felt onto a bamboo mat.

 11. Peel off the remaining piece of tissue paper
 12. Roll the picture in the bamboo mat
 13. Roll the picture tightly in the mat, keep rolling and squeeze the bamboo mat as you are rolling. This squeezes the water from out of the felt material and finally binds all the fibres together. Keep unrolling the mat and then rolling it back up again until you have hardly any suds or water coming out. This should take 5-10 minutes
 14. When you have rolled the picture for about 10 minutes, take it out of the mat and leave it to dry for 24 hours
 15. Once the piece is dry it is time to embellish the piece. I have decided to embroider on the reindeer's antlers using cross stitch silks.
16. For a final touch I have used glitter glue for Rudolph's nose and spot on my reindeer's back. You could also add sequins, buttons, beads feather etc etc

This is a perfect activity to invite parents and carers into school to help out with. Key stage one children can design their picture on paper and then select the felt material. Young children should be able to tear off pieces of felt and lay then down to create their pictures. Parents can help with the binding and rolling part. A lovely activity for a fun Christmas craft afternoon.

Key stage 2 can think about what function the piece will have once it has been made. If it is going to be framed to create a wall hanging, sewn on a bag as a interest panel or even add a fabric stiffener and create a sculptural piece. Key Stage 2 children should be considering composition and use of colour throughout the making process.

Felt making workshops are available for schools clubs and organisations, if you are interested please contact me on lisamart@hotmail.co.uk

Saturday 26 November 2011

Children Christmas Craft no 6 - Christmas wrapped woollen branches

As promised Christmas crafts Number 6 brings you something a little different. For the past few days we have looked at a range of different decorations that can be made into cards, calendars, Christmas tags and also to be hung on trees. Today brings you an interesting display idea as well as a beautiful Christmas craft – Christmas wrapped woollen branches.
You will need: A branch (please only use branches that have fallen and are on the ground – do not cut branches off trees), pva glue and wool.

 Finished woollen wrapped branch

1. Firstly you need to select your branch, it is good to look for one that has got a few branches off it and has a nice form to it.
2. Secondly choose your wool, I have used cool shapes of pink and purple on mine with a hint of green and white but you can use any colours you like.
3. Now you are ready to start binding your branch. Start by placing a bit of pva glue at the bottom of the branch, glue the wool to this and start wrapping around the branch tightly.
4. Each time you want to change colour glue the last bit of the previous piece of wool to the branch and the glue the next colour where the last colour finishes.


5. Continue to bind you branch until it is all covered, when you get to areas that branch off, criss cross the wool over so that you see as little of the branch underneath as possible.
6. When you have finished you branch why not hang some of your lovely decorations you have made on it to complete a stunning classroom display.


Ahh now doesn't that look lovely
You could also use the same technique of a few smaller branches and make a unique Christmas table centre piece.
Foundation and key stage one children may find the binding a little difficult. There are other mediums that you can use instead of wool for this age group and still achieve some interesting results. Why not have the children paint their branches. For key stage one children you can get them to think about their colour choice and maybe painting the branch in strips or bands of colours. While the paint in wet you could add some glitter for a real festive finish. Another option would be to collage the branch in Christmas tissue paper by ripping small sections off the tissue paper and gluing the the branch. This gets messy but when dry looks beautiful.
Key stage 2 children will enjoy this activity, you could see if they can wrap two to three colours of wool at a time around the branch to create a more interesting finish. If you cover or spray the branch with pva you can add glitter onto the finished piece for a bit of sparkle.
Older children could also try sewing sequins onto the finished wool wrapped branch – to create a spiral effect or pattern across the branches

Friday 25 November 2011

Children's Christmas Crafts no 5 - Christmas Weaving

Christmas wouldn't be Christmas without a bit of weaving. And that's exactly what Christmas craft No 5 brings to you. Children love weaving and using this technique to create all types of craft ideas from cards, to tags, to placemats and so forth. These ideas below can be made into lots of different crafts. If you use thin paper you can laminate your finished weaving and create placemats and coasters. This way they can be wiped clean and reused.

You will need card, patterned paper, glue, ribbon and embellishments
 Completed Christmas Weaving

1.     Select a weaving shape in the style of your choice or draw your own shape
2.     Now select your paper you are going to use to weave with. Think about what colours you want, complementary of contrasting. Cut a few strips of each colour. ( you can use anything to weave with including ribbon, bits of plastic, carrier bags, fabric, plastic cutlery, twigs – you can be as adventurous as you want)


3.     You need to make your slats to weave your paper through. You can do this using a craft knife and steal ruler. Carefully make out your slats using a pencil leaving about a 1 cm gap between each slat. Cut along the lines using a craft knife. Alternatively you can make the lines and fold the shape in half and use scissors to cut along the lines (this will leave a fold make in your shape)
4.     Staring from the back of your shape, weave a strip of paper over and under the cut slats. Secure the ends with glue at the back of the shape.

 First row completed


5.     Select your next strip and weave over and under the alternative slats in contrast to the first strip. This will give you a checker board effect. Continue this method until the shape is full.

6.     Make sure all the ends are securely glued down

7.     I have added glitter glue around the edge of my cracker for a bit of sparkle and attached a felt pre cut reindeer either end of the cracker. You could also tie ribbon around the ends, write messages on and embellish with sequins.


The picture above is from a Christmas crafts training session carried out at a local school - The picture shows a Christmas tree that has had pieces of paper weaved through. As you can see the tree has been painted using acrylic green paint and the member of staff has embellished the tree with buttons and glitter glue.

Something completely different tomorrow...

Thursday 24 November 2011

Children's Christmas Crafts no 4- Iris Folding

Christmas Iris Folding – This is a great activity for fine motor skills, symmetry, pattern, precision and fun. You can use absolutely any design for this, all you need to do is cut a shape in the middle to create your iris folding. Why not try using Christmas trees, Angels, Snowmen etc.

You will need, Card, scissors, paint, patterned/coloured paper and glue.
 Completed Iris Folded Christmas Tree

1. Start by drawing around your template on card and then cutting out two copies of your shape carefully. One will be put aside for later.
2. Then label the edge of your shapes. In my decoration I am doing a Christmas tree so have 3 side which I have labelled 1-3. If you are using a square, circle or rectangle labelled 1-4 (obviously is you have 5 sides you will label up to 5 and so on and so forth) These numbers will be used as a guide to place your folded bits of paper and create your fabulous iris folded decoration.

3.   Cut a series of rectangles from patterned or coloured paper (once again you can create your own painted patterned paper for this).
4.     Fold each strip in half.


 5. Pick up your first strip, glue each end of the folded strip with the folded side of the rectangle paper facing the inside of your template as shown. Glue on the side marked number 1, continue this process around to number 3 as shown below.

 6. Once you have completed one cycle, start over again at number 1. This time overlap the paper by about half a centimetre.
7. Continue this with each layer
 8.    Continue until you have filled in the centre of your design.
 9.   Tidy up any ends and glue the pre cut shape put aside in step one to the back of your decoration.

Younger children may need help cutting the strips and cutting out the centre of their shape.
 You may also find it more successful if Key Stage One children lay their folded piece of paper in rows rather than in a spiral. This will still create a beautiful decoration of slatted paper rather than spiralled.
  
 To complete my tree I have finger painted using yellow and blue acrylic paint, mixing on the tree rather than in the palette. This presents a nice textured finish. Add ribbon and embellishments.

Key stage two children can try to create a spiral effect in the centre by rotating the piece of paper layered around the outside. Each time you start a new cycle you start with the same one, you finished the previous cycle with so in effect number four becomes number 1. You can also encourage older children to incorporate this technique in a design to make a card. Why not have a look at my blog Noel Cards http://lisamart.blogspot.com/2011/11/christmas-crafts-2-noel-card.html

Here are a couple of examples that were made on a recent school staff Christmas Crafts training session.


I will post templates that can be used for this activity on tomorrows blog which will look at some cute weaving ideas.

Wednesday 23 November 2011

Children's Christmas Crafts no 3 - Bead tree decorations

Quick and easy tree bead decorations are the no 3 idea for Christmas Crafts to do with children. These simple bead decorations are quick and easy to make. These beautiful decorations are ideal for Christmas bizarre and fundraising – as well as embellishing the classroom Christmas tree or to add as a Christmas card topper.
You can also use this activity to discuss repetition, pattern, use of fine motor skills and counting skills for young children.
You will need pipe-cleaners, beads and ribbon
 Completed Bead Wreath

 1. To make each decoration you will need a pipe cleaner and about 30 beads. I am using star beads but you can use any type of bead for this decorations and get amazing results.
2. I have included 6 round beads (you could use barrel beads instead) which I am going to use to add a bit of interest to my decoration.
 3. Slide 6 beads onto the pipe-cleaner. Be careful of the wire at the end of the pipe-cleaner. Once you have added the 6 beads, add one of your coloured round beads.
 4. Continue with this pattern until all the beads have been used up
5. To make the rosette bring the first and last bead together by twisting the pipe-cleaner as shown in the picture above.  
 6. Twist the pipe-cleaners around whilst holding the wreath securely. This will hold the wreath in place.
 7. Make a bow for the top of the wreath by wrapping the pipe-cleaner around your finger
 8. Hold the two bow shapes and twist the wreath again. This will secure your bow in place – alternatively you can tie a piece of ribbon or thread around the bow to hold in place.
 9. Think about other shapes you can make such as a Christmas tree. This can be made in the same way as above but when you have added all the beads, instead of making a circle, fold the pipe-cleaner filled with beads in half. 
 10. Now bend each half to make a triangle formation
 11. Twist the two ends together
12.   Now add a bell.
 13. Cut off the ends and add a piece of ribbon to the top

Here is another bead decoration idea to try.
 1. Cut your pipe-cleaner into three equal parts (this will make one snowflake). for younger children they can use three pipe-cleaners twisted together rather than cutting them.
 2. Twist two of the pipe-cleaner part together to make a cross
 3. Add the third pipe-cleaner part by twisting this through the centre of the cross to make a star/snowflake shape
 4. Thread six beads onto one of the “snowflake points”.
 5. At the end add one of the round beads and fold the remaining part of the pipe-cleaner backwards. This will secure the beads in place.


 6. Repeat this on the other five snowflake points
 7. Add a piece of ribbon at the top to complete the decoration

8. You can also add an embellishment in the centre to finish off the decoration. In this piece a felt Rudolph has been glued using pva glue to the centre.

These are great decorations for all ages to try. For younger children you can use bigger beads or buttons with bigger holes in to make it easier to thread.
Older children should be encourage to consider pattern formations and use of colour. They can also experiment with other shapes that can be made using the pipe-cleaner - what about trying to make a bell shape or a star?
Why not encourage your class to make a whole batch of these decorations to sell at your schools Christmas fete?

These simple snowflake bead decorations are quick and easy to make. Ideal for Christmas bizarre and fundraising – as well as embellishing the classroom Christmas
You will need pipe-cleaners, beads and ribbon

For each decoration you will need a pipe-cleaner and 30 beads, plus 6 round beads.